 Save
Save The smell of celeriac roasting at my local bistro kept pulling me back until I finally asked what made those golden cakes so addictive. The chef laughed and whispered it was just root vegetables and patience. I went home that same day and grated my knuckles raw trying to recreate the magic.
My sister visited last winter and I served these for brunch thinking they were just fancy hash browns. She ate three helpings and asked if I could make them every Sunday from now on. Now theyre the only thing her kids actually request when they visit.
Ingredients
- 500 g celeriac: This ugly root is the secret star with its celery undertone and incredible ability to crisp up
- 200 g potatoes: Adds structure and helps bind everything together without overwhelming the celeriac flavor
- 1 small onion: Finely grated onion disappears into the mixture but adds essential sweetness
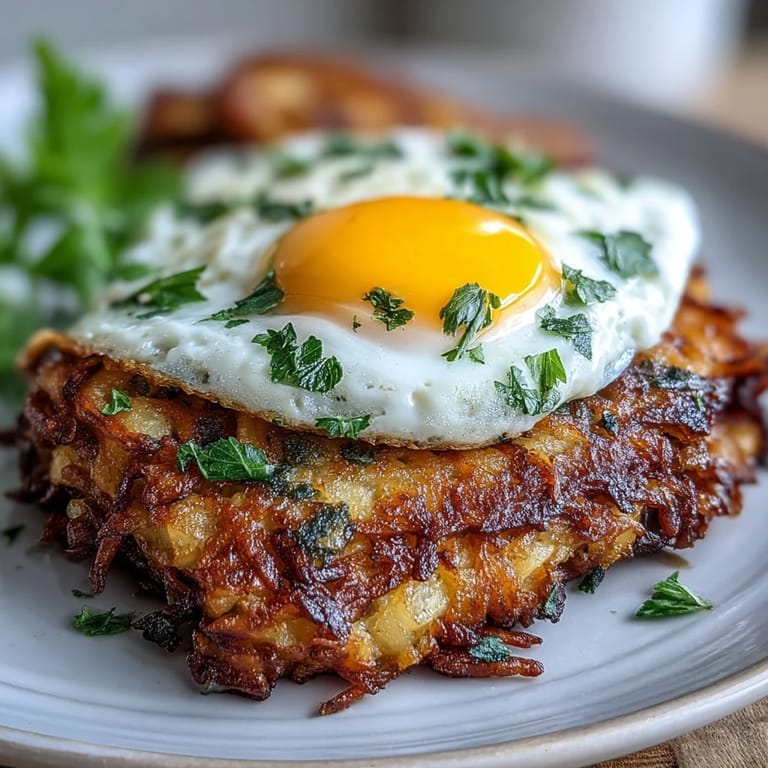
- 2 tbsp fresh parsley: Bright green herbaceous notes that pop against the earthy roots
- 2 tbsp plain flour: Just enough to hold the shreds together without making them doughy
- 1 large egg: The binding agent that keeps these from falling apart in the pan
- 3 tbsp olive oil: Don't skimp here or you'll miss that restaurant-quality golden crust
- 200 g Greek yogurt: Thick and creamy enough to stand up to the harissa heat
- 1½ tbsp harissa paste: Adjust based on your spice tolerance but don't skip it entirely
- 1 tsp lemon juice: Essential brightness that cuts through the rich yogurt
- 4 large eggs: One per person for that perfect runny yolk situation
Tired of Takeout? 🥡
Get 10 meals you can make faster than delivery arrives. Seriously.
One email. No spam. Unsubscribe anytime.
Instructions
- Squeeze the daylights out of your grated roots:
- Wrap the celeriac and potato in a clean kitchen towel and twist until your arms ache. Every drop of water you remove now is crunch you'll get later.
- Mix until it feels like a team:
- Combine everything in a large bowl and get your hands in there. The mixture should hold together when you squeeze it.
- Fry like you mean it:
- Heat that oil until it shimmers and don't crowd the pan. Let each side develop a deep golden crust before flipping about 4 to 5 minutes per side.
- Make the magic sauce:
- Whisk the yogurt with harissa and lemon until it's a pretty coral color. Taste it and adjust the heat level now.
- Fry eggs to your exact specifications:
- Fresh eggs make the prettiest fried eggs with tight whites and bright yolks. Season them the second they hit the pan.
 Save
Save These became my go-to when I'm cooking for friends who think they don't like root vegetables. Something about that crispy exterior and soft interior wins everyone over every single time.
Getting That Perfect Crunch
I've learned that patience with the squeezing step makes or breaks this dish. The dryer your vegetable mixture the shatteringly crisp your rösti will be. I sometimes even weight the squeezed bundle with a heavy pan for 10 minutes while I prep everything else.
Balancing The Heat
Harissa brands vary wildly in their intensity so start with less than the recipe calls for. You can always add more but you can't take it back. The yogurt helps tame the fire but let your guests adjust their own spice levels with extra harissa on the table.
Make-Ahead Magic
The rösti mixture actually benefits from sitting in the refrigerator for an hour or two before frying. This gives the flour time to hydrate and the flavors to meld. Plus having everything prepped means you can just focus on frying when hungry people are waiting.
- Form the patties on parchment paper and freeze them raw for quick weekday breakfasts
- Keep the harissa yogurt separate until serving or it will become watery
- A warm oven keeps the first batch perfectly crisp while you finish the rest
 Save
Save These rösti have turned more skeptics into celeriac believers than any other dish in my repertoire. There's something deeply satisfying about transforming such a humble vegetable into something this special.
Recipe Questions & Answers
- → What is the best way to prepare celeriac for the rösti?
Peel the celeriac and grate it coarsely, ideally using a box grater or food processor. Crucially, squeeze out as much moisture as possible from both the grated celeriac and potato using a clean kitchen towel before mixing. This ensures crispy rösti.
- → Can I prepare parts of this dish in advance?
The rösti mixture can be prepared a few hours in advance and stored in the refrigerator, but it's best to fry them just before serving to maintain crispness. The harissa yogurt can be made a day ahead and kept chilled.
- → What if I don't like harissa or prefer a milder flavor?
If harissa isn't to your taste, you can substitute it with sriracha for a different kind of chili kick, or simply use plain Greek yogurt with a squeeze of lemon and fresh herbs like dill or chives for a milder, refreshing sauce.
- → What are the keys to achieving truly crispy rösti?
The secrets to crispy rösti are thoroughly squeezing out excess liquid from the grated vegetables, using enough olive oil for frying, and cooking them in batches without overcrowding the pan. Fry over medium heat until deeply golden brown on both sides.
- → Can I make substitutions for the main vegetables?
While celeriac and potato form the traditional base, you can experiment. Sweet potatoes can be used instead of regular potatoes for a sweeter flavor, or parsnips could be incorporated for a different earthy note. Ensure to adjust moisture content if needed.
- → Is this dish suitable for a gluten-free diet?
Yes, this dish can easily be made gluten-free. The main components are naturally gluten-free; just ensure you use a gluten-free all-purpose flour blend in place of regular plain flour for the rösti mixture.