Save
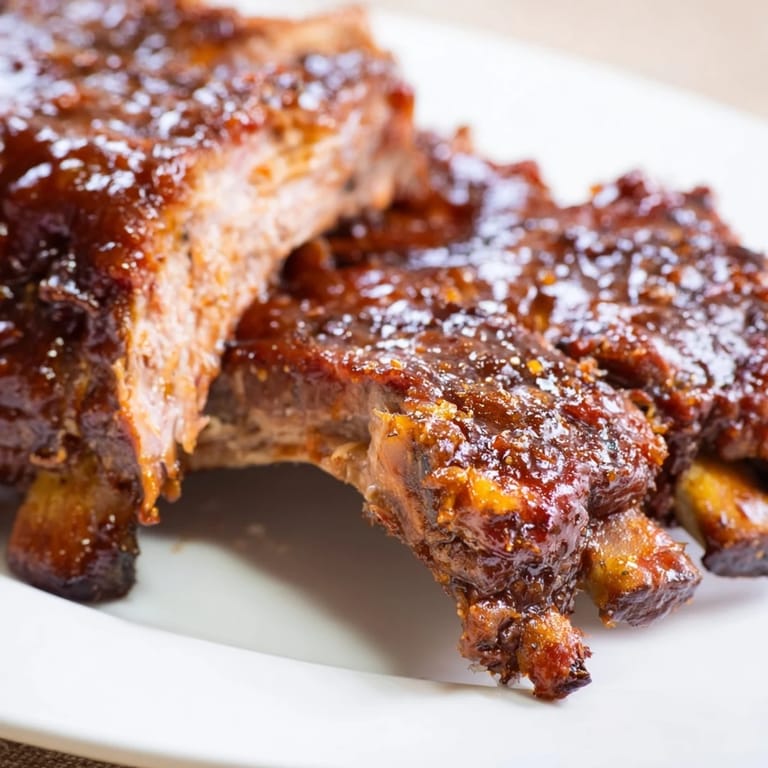
Save My neighbor Tom taught me his rib technique during a block party years ago. He had this massive smoker setup in his driveway, and the whole street smelled incredible. What surprised me was how he started them in the oven first. That little trick changed my entire approach to ribs forever.
Last summer, I made these for my dads birthday. Hes usually pretty quiet about food, but he went back for thirds. That honey in the glaze makes everything better somehow. My sister called me the next day demanding the recipe.
Ingredients
- Ribs: Pork back ribs work beautifully, but beef ribs give you that extra richness. I grab whatever looks fresh at the butcher counter.
- Olive oil: This helps the rub stick and creates a nice seal on the meat.
- Brown sugar: Caramelizes into that gorgeous sticky coating everyone fights over.
- Smoked paprika: Skip this and you lose that authentic barbecue flavor without the smoker.
- Garlic and onion powder: Use the granulated kind, not garlic salt. You want to control the sodium.
- Barbecue sauce: Find one you actually like eating plain. It matters.
- Honey: The secret ingredient that makes the glaze cling to every bite.
- Apple cider vinegar: Cuts through all that richness just right.
Tired of Takeout? 🥡
Get 10 meals you can make faster than delivery arrives. Seriously.
One email. No spam. Unsubscribe anytime.
Instructions
- Get your oven ready:
- Preheat to 150°C (300°F) and line a baking sheet with foil. Trust me, cleanup will thank you later.
- Prep the ribs:
- Pull off that silvery membrane on the back with a paper towel. Pat the ribs dry so the rub actually sticks.
- Make the magic rub:
- Mix brown sugar, smoked paprika, garlic powder, onion powder, pepper, salt, and cayenne in a small bowl.
- Coat everything:
- Rub olive oil all over the ribs, then press that spice mixture into every nook and cranny.
- The long wait:
- Place ribs meat-side up on the baking sheet, cover tightly with foil, and bake for 2 to 2½ hours.
- Whisk the glaze:
- While ribs bake, stir together barbecue sauce, honey, and apple cider vinegar until smooth.
- Crank up the heat:
- Pull ribs out and boost your oven to 220°C (425°F) or fire up the grill.
- Get them sticky:
- Brush those ribs generously with sauce and return to the oven or grill uncovered for 10 to 15 minutes.
- The hardest part:
- Let them rest for 5 minutes before slicing. This keeps all those juices where they belong.
 Save
Save These ribs have become my go-to for housewarming gifts. Something about arriving with a tray of fall-off-the-bone ribs makes you instant family. Plus, they reheat surprisingly well the next day.
Making Ahead
I rub the ribs the night before and let them hang out in the fridge. The flavors really develop that way. Just bring them to room temperature before baking.
Side Dish Pairings
Creamy coleslaw cuts the richness perfectly. Cornbread soaks up all that extra sauce. And baked beans just feel right alongside ribs.
Leftover Strategy
Ribs reheat beautifully wrapped in foil at 160°C (325°F) for about 15 minutes. Add a splash of water to create steam.
- Pulled rib sandwiches with extra slaw the next day
- Chop leftover meat into mac and cheese
- Freeze glazed portions for up to three months
 Save
Save There is something deeply satisfying about making restaurant-quality ribs at home. Plus, nobody judges you for licking your own fingers.
Recipe Questions & Answers
- → How do I know when the ribs are done?
The meat should pull away from the bones easily, and you should see about ¼ inch of bone exposed. When you gently twist two adjacent bones, they should separate with little resistance. The internal temperature should reach 190-205°F for optimal tenderness.
- → Should I remove the membrane from the ribs?
Yes, removing the thin silvery membrane from the back of the ribs is essential. It prevents seasonings from penetrating and becomes tough and chewy during cooking. Simply slide a knife under one corner, grip with a paper towel, and peel it off in one piece.
- → Can I make these entirely on the grill?
Absolutely. Set up your grill for indirect heat and maintain around 300°F. Cook the ribs covered for 2-2½ hours, then brush with sauce and move over direct heat for 5-10 minutes to caramelize. Wood chips like hickory or mesquite add authentic smoky flavor.
- → What's the best cut of ribs to use?
Baby back ribs are leaner and cook faster, while St. Louis-style spare ribs have more fat and flavor. Both work beautifully with this method. Baby backs are more tender, while spare ribs offer richer taste and more meat per bone.
- → How long should I rest the ribs before serving?
Let the ribs rest for at least 10-15 minutes after cooking. This allows the juices to redistribute throughout the meat, ensuring each bite stays moist. Cover loosely with foil during resting to maintain warmth without continuing to cook.
- → Can I prepare these ahead of time?
Yes, you can cook the ribs completely, cool, and refrigerate for up to 3 days. Reheat gently wrapped in foil at 300°F until warmed through, then brush with fresh sauce and caramelize under high heat for 5 minutes. The flavor often improves after resting overnight.